|
|
Post by fivedriver on Mar 29, 2022 13:34:45 GMT
Hi everyone, May I share a project that's ongoing please? Ever since I bought TOG i have dreamt of giving her twin front lights. Years ago I mocked up an idea in photoshop to see how she'd look if I replaced the factory oval lights. 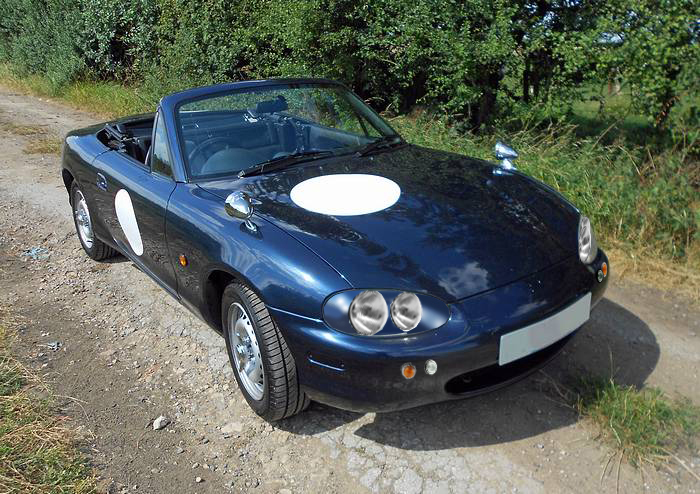 My plan had been to fit seperate light lenses into the existing lights. My main roadblock has been finding suitably sized lights. Back in the day a french company called Morette produced light clusters similar to this for many car models including the NB. They are however, very rare now and quite expensive. Fortunately I found a set. A kind gentleman by the title of MazdaMender allowed me to purchase a set he had going spare. One area where my design differs from the Morette lights is the position of the indicators. Whereas I have positioned TOG's indicators in her bumper, Morette put the indicators in their cluster. 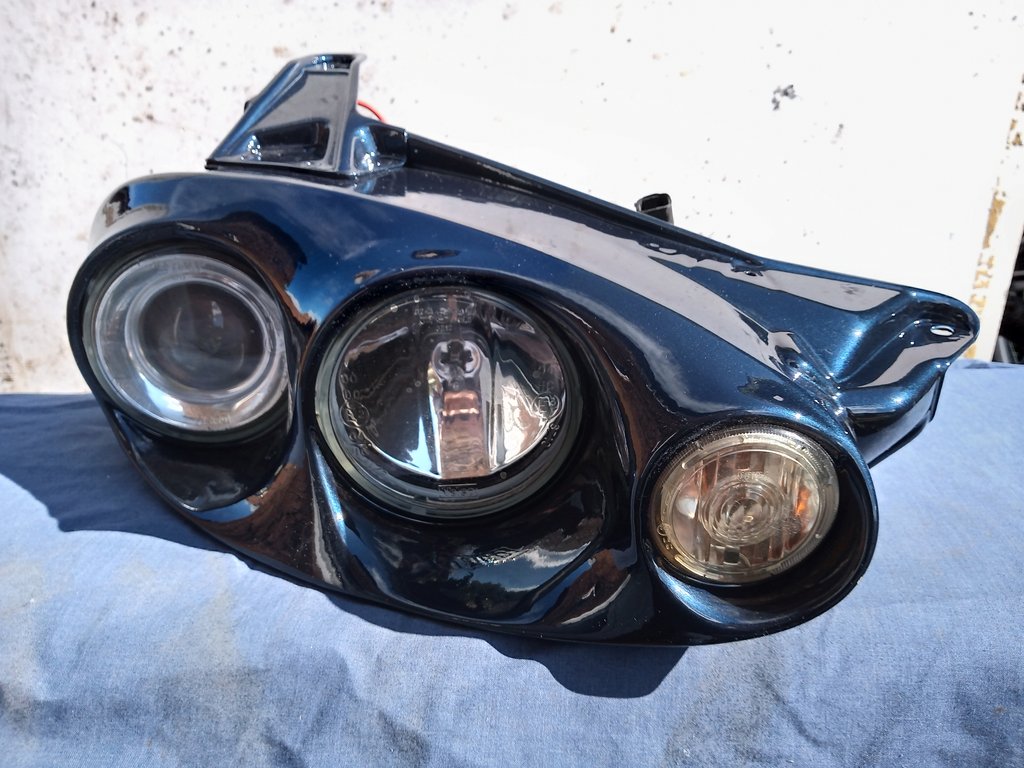 This means that I am unecessarily doubling up on indicators. My solution is to use the indicator opening as a fresh air inlet into the engine bay. 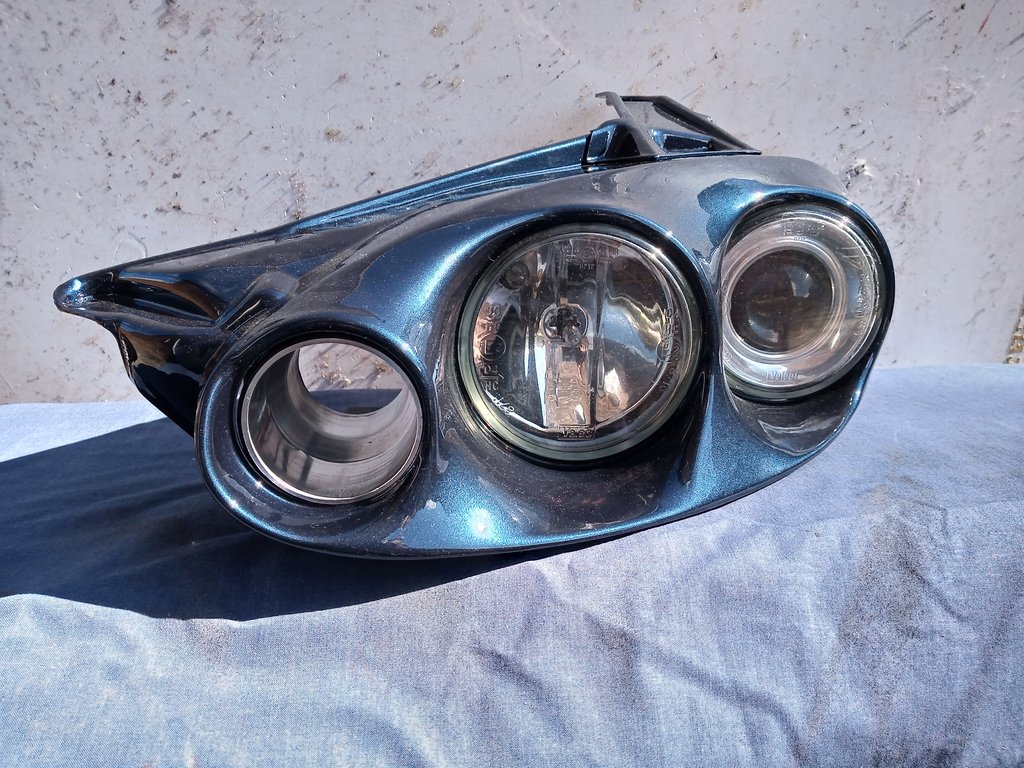 Using a selection of items cobbled together from Demon Tweaks and Car Builder solutions I think I can make it work.  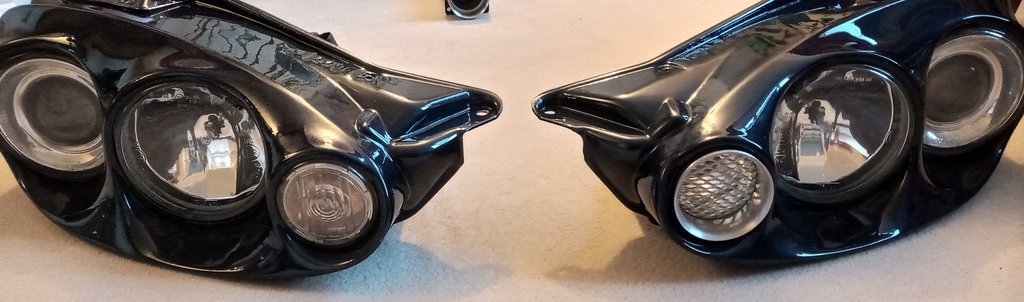 Here's another ps mockup of how she could look soon. 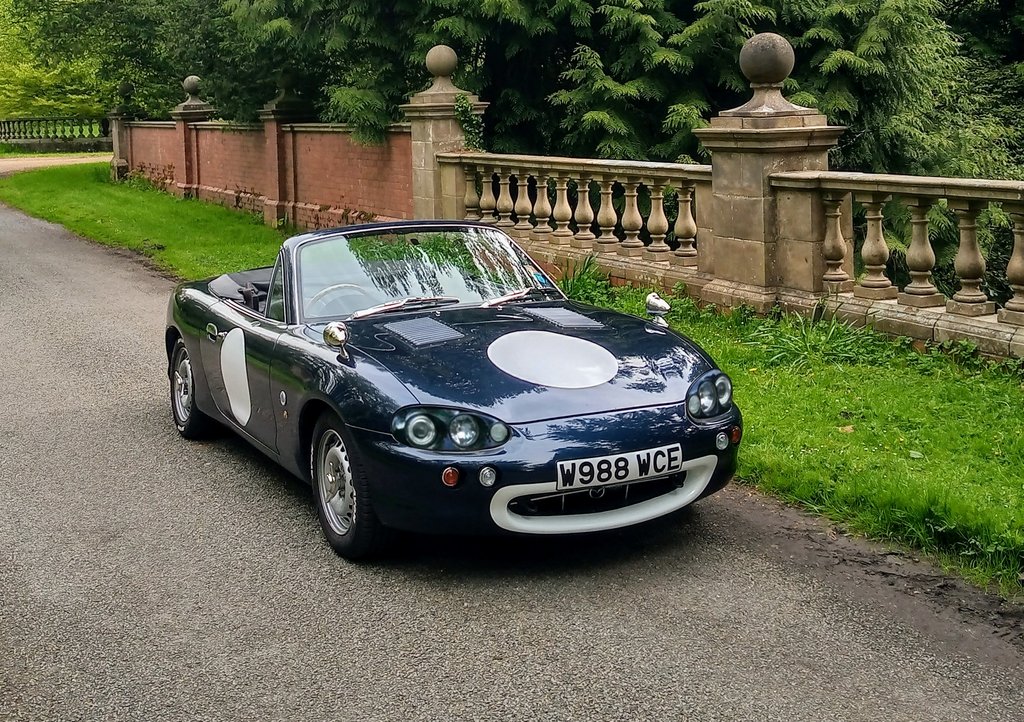 These units are wired slightly differently so not a direct "plug and play" replacement which means, I may be drawing on the collective information bank to help me complete the project.  Cheers, Guy |
|
|
|
Post by Roadie on Mar 29, 2022 20:01:36 GMT
That's going to look very nice. Are the existing headlights combined dip and main beam three pin H4 bulbs? If so probably best to make up a pair of adapters to connect to the new blingatronic units. Unusually for this forum I'm not too far away to offer assistance. Let me know if you need anything.
|
|
|
|
Post by Jeff - jthspace on Mar 29, 2022 21:26:56 GMT
Impressed by the lights and the photoshop skills! Wish I could use PS like that.
They are separate low beam / high beam bulbs, low beam being what I call “eyeball” shape and the high beam looks like an H1 or H3 from a zoom onto a photo. Not exactly plug and play but TOG would expect nothing different!
|
|
|
|
Post by fivedriver on Mar 30, 2022 9:09:58 GMT
That's going to look very nice. Are the existing headlights combined dip and main beam three pin H4 bulbs? If so probably best to make up a pair of adapters to connect to the new blingatronic units. Unusually for this forum I'm not too far away to offer assistance. Let me know if you need anything. Hi Roadie thanks for offering to help, that's very much appreciated 👍 The lights came with a modified loom so with a bit of luck they might be relatively straightforward to connect. (They'll need to be for me to cope with the task 😉) |
|
|
|
Post by mondrian on Mar 30, 2022 11:22:11 GMT
|
|
|
|
Post by fivedriver on Apr 1, 2022 14:30:53 GMT
Here we go then. Before..... 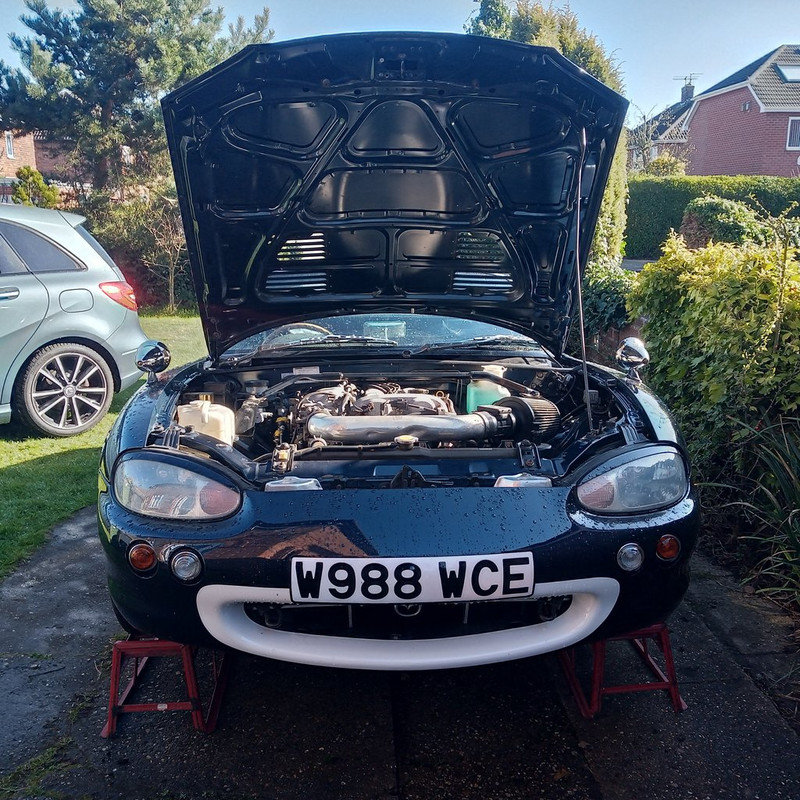 After...  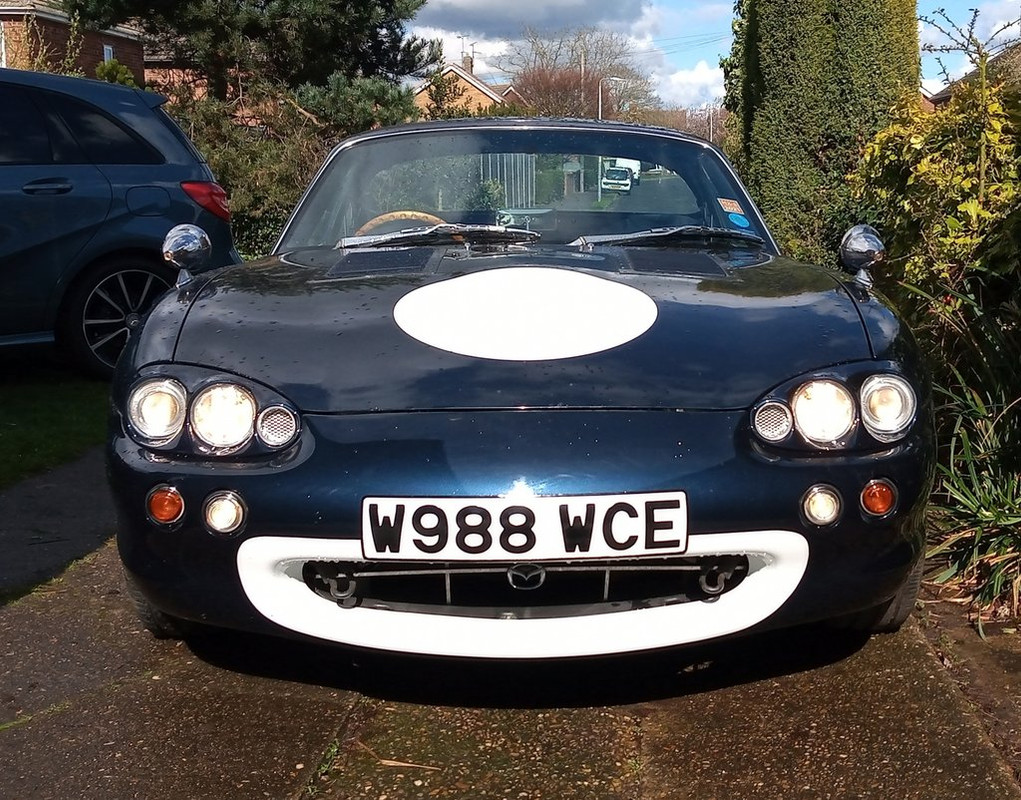 I'm very pleased with the results. A big thankyou goes to Jeff (Jeff-jthspace), Ian (RS) and Paul(Roadie) for their help and guidance. Couldn't have done it without you guys,  |
|
|
|
Post by Jeff - jthspace on Apr 1, 2022 14:39:18 GMT
What a difference! Looking very individual, very nice. 👏
|
|
|
|
Post by Roadie on Apr 1, 2022 14:54:02 GMT
Wow. That looks amazing. The whole car looks lower, wider and more balanced. Love it, love it, love it. With the separate sidelights and indicators it looks like it should always have been that way. I think you once said you were going for the 'cafe racer' look. Nailed it.
|
|
|
|
Post by Jeff - jthspace on Apr 1, 2022 15:10:04 GMT
One for Mondrian to admire  One for your Avatar (maybe)  |
|
|
|
Post by RS on Apr 1, 2022 15:32:59 GMT
Well done Guy, it's totally transformed the look of your car, and you've achieved the look you were after.  |
|
|
|
Post by fivedriver on May 14, 2022 16:17:34 GMT
Hi folks. I'm sending out an SOS.
I appear to have developed a peculiar problem. Well, not me exactly. TOG has developed a peculiar problem.
Her nearside headlight is not illuminating anymore.
I swapped bulbs from nearside to offside and it still lit so I think that rules out the bulb.
Same story with the relays. Swapped and the offside illuminated but not the nearside.
The full beam lights up on both sides. Originally I had this issue which was solved by turning the headlight plug through 180° but not this time sadly.
Another oddity is that I've lost the blue full beam warning lamp on the dash. Are there things related?
Could it simply be a fuse?
I've looked under the bonnet and the 40amp fuse looks to be intact as is the 20amp inline fuse wired into the new lights loom. Is there another fuse I should be looking for?
Any help with this puzzle is much appreciated.
Cheers
Guy.
|
|
|
|
Post by RS on May 14, 2022 18:28:32 GMT
Bit of an odd one that....
There are 2 fuses, one, for the left hand light and one for the right, I'd check them first (remove the fuse and check the continuity with a meter).
Then I'd check for a live feed at the plug for the bulb, from then on, I'd start checking the wiring back through to the original vehicle wiring.
If possible, unplug the whole of the new lights and plug in a couple of the old bulbs to the OE wiring to see if it all works properly as it did before
Sorry, I can't be more of a help, it's a shame that you're some distance away from me as I'd be round to help you out !
|
|
|
|
Post by fivedriver on May 14, 2022 19:22:39 GMT
Thanks for the help RS. I had a look under the righr hand side of the dashboard and found a fuse box.
Fuses #19 & #20 seem to be for the headlights. They are 15amp and blue in colour but both appear to be visually intact 🤔
Perhaps I'll invest in a multi-meter and try checking the wiring.
Using the old lamp unit to check the feed up to the new loom is a good call and may narrow down my search a bit. Thanks for the suggestion. 👍
Hard to fathom how these things work one minute and not the next 😳
Ah, the joys of an older, modified car 😄
|
|
|
|
Post by fivedriver on Sept 4, 2022 7:04:37 GMT
Good morning all. I wonder if I might share another lighting project with you? Following on from the front lights it has always been my ambition to modify the rear lights in a similar manner. I recognise that this might not be to everyone's taste but in my continuing quest to make TOG look older than she is I hoped to replace the original lights with somethign more period. I had been looking for a suitable cup to mount the lenses using the technique I applied when I mounted the sidelights and indicators in the front bumper a while ago. In the end I went the custom 3D printing route with the help of Luke at FormotivBetween us we designed three cups to hold the new lamps. 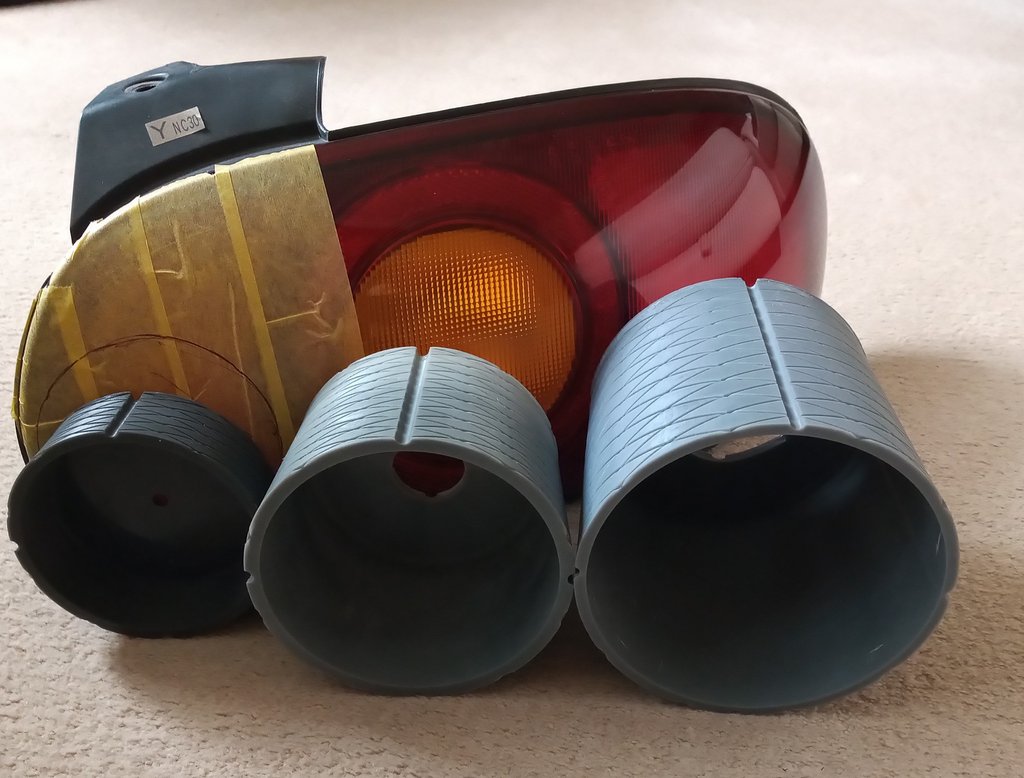 It was then a case of cutting holes into the existing light units to accept the cups. 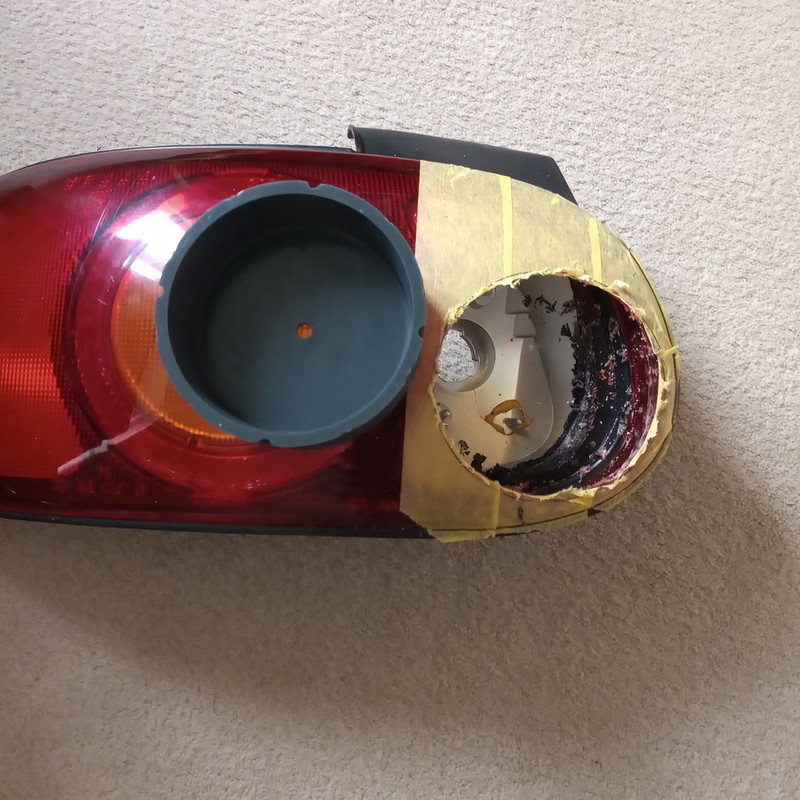 I had asked Luke to make the 3D prints over sized so that I could position them where I wanted and then remove any excess material. Luke was happy to create the complex, compound shape of the cup lip in 3D but that would have meant me having to position the cup exactly where the shape required. Probably beyond my skill level. Doing things this way built in a little wiggle room to account for any ineptitude on my part.  I used a dremel type tool with cutting and sanding attachments to work away at the openings until I got close to the shape I needed. You can see in the first image where Luke had included surface texture for adhesion and vertical lines for orientation purposes. These helped me line up the cups with the thrust line of the car. I opted to fit the smallest of the cups first and positioned it as close to the inside edge of the OE lens as I could as it looked as though fitting all three lamps into the cluster would be a squeeze. The shape of the OE lens is at it's flattest at this point so the cup was the shallowest. Eventually, after a bit of work I got things to fit and moved on to the next cup. This time I plumped for the largest of the three which would fit at the outermost edge of the OE lens. This one required the most work. Since I hoped to retain the existing mounting points of the OE light I was moderatley constrained by that. This meant I had to fit the cup in as far out as I could without destroying those mounting lugs.  Alot of material was removed at the back of the light to allow the new cup to sit in the required position. I have reinforced the resultant structure with fibreglass body filler to regain some strength.  Then it was simply a matter of rinse and repeat. Time consuming work but quite rewarding. What was a challenge was mirroring things onto the other cluster as measuring over compound curves is tough. 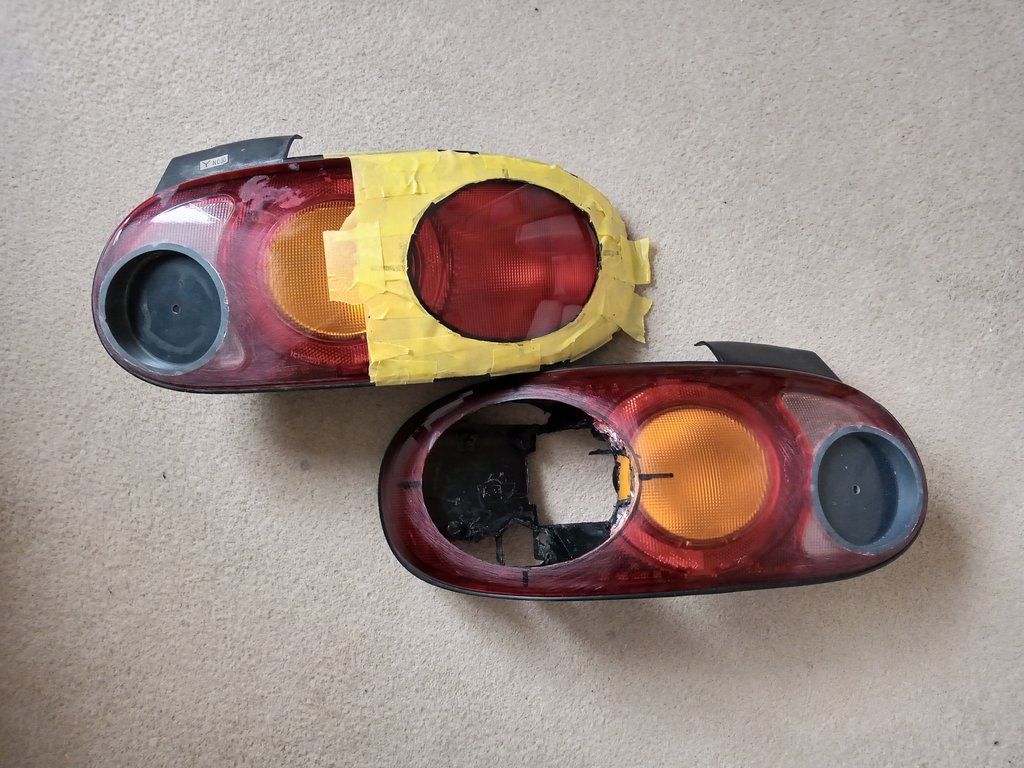 You can see how deep this cup is. Alot of excess material was removed and the end result resembles a torpedo tube on a WWII submarine....  For the third and final cup I marked out the middle of the distance between the other two cups and drew lines between their extremities. This defined the position for the middle cup. 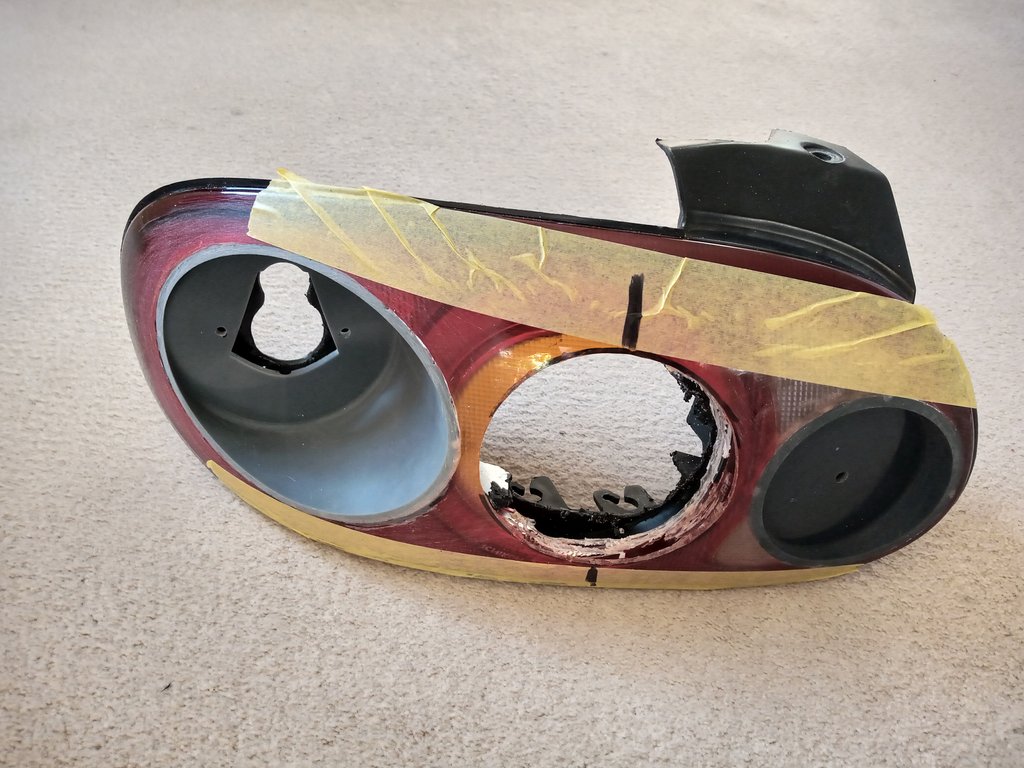 By coincidence the lamps and reflector that I chose all increase in diameter by similar steps so things worked out quite symmetrically.  The holes in the base of each cup are to allow for the bulb holders of the new lamps. With the cups glued in I prepped the plastic surface for paint. My local factors suggested using an adhesion promoter plus a plastic primer. I took their advice and used whizz cans to paint the clusters. 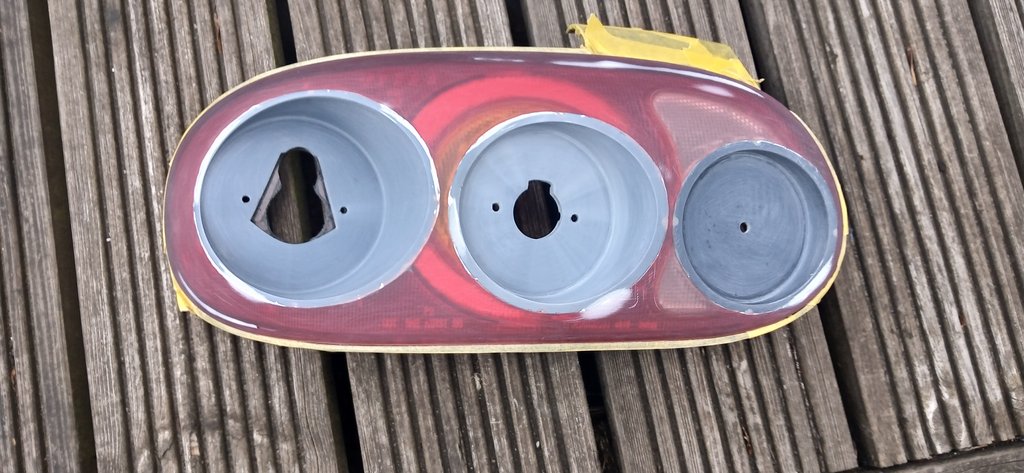 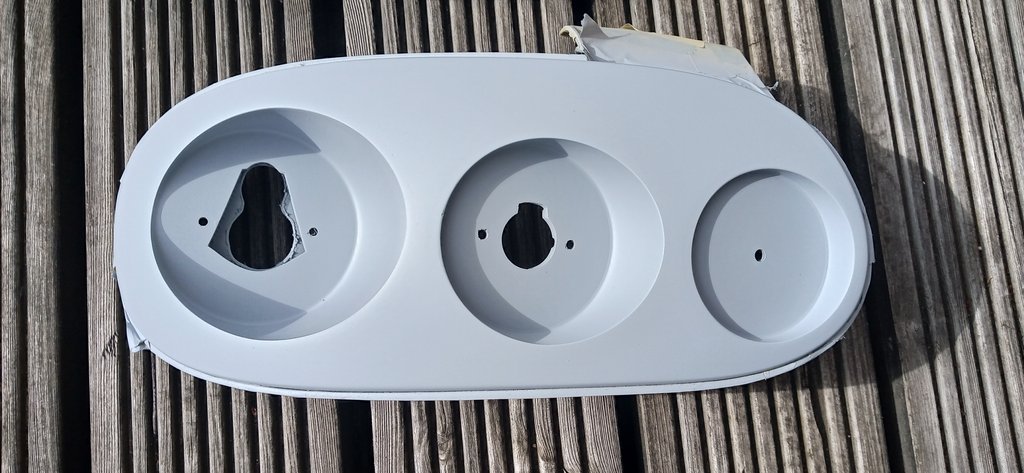 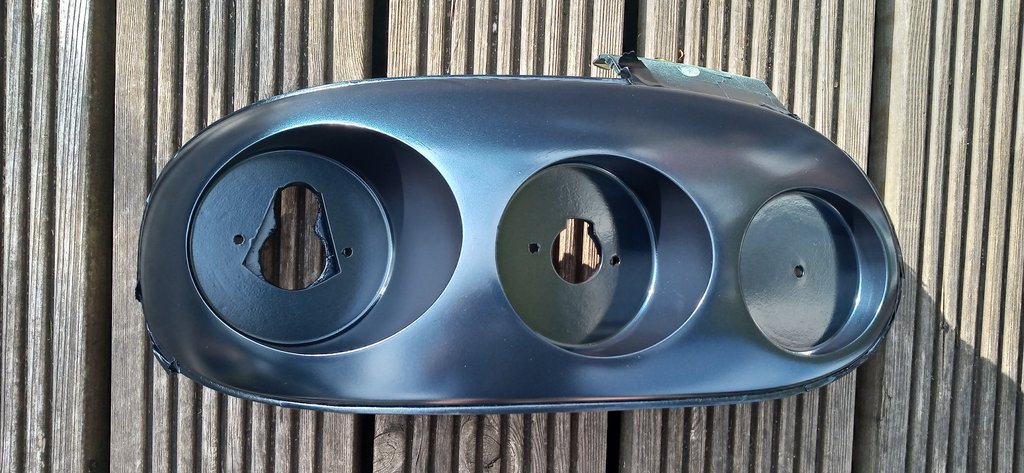 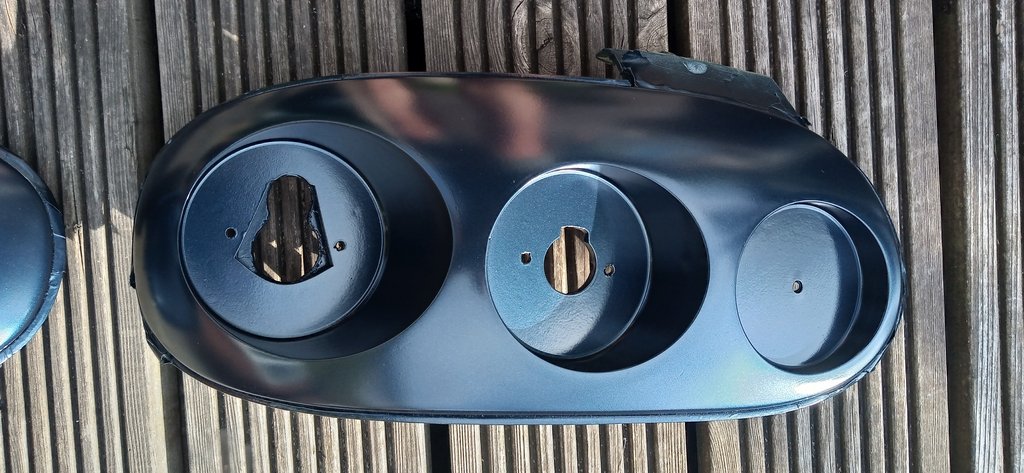 The colour's not perfect from a spray can but it's passable. 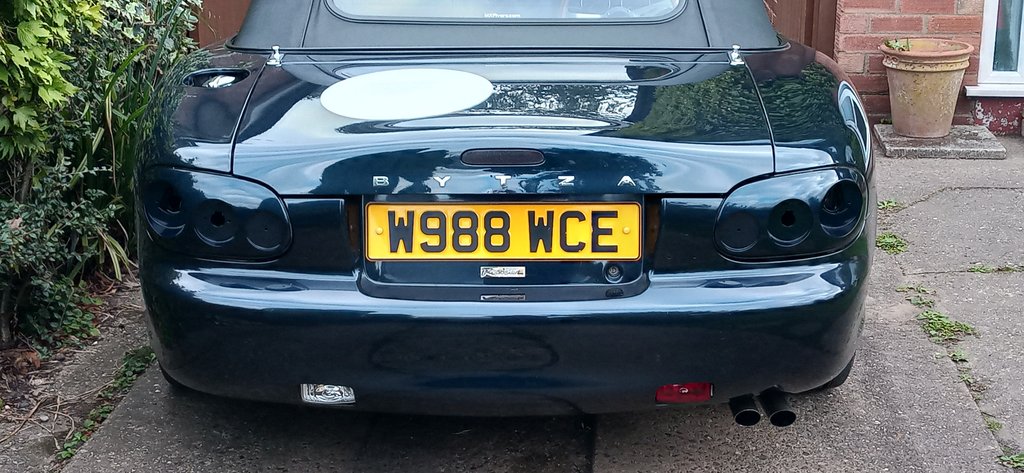 Lastly, it was time to fit the lamps..... 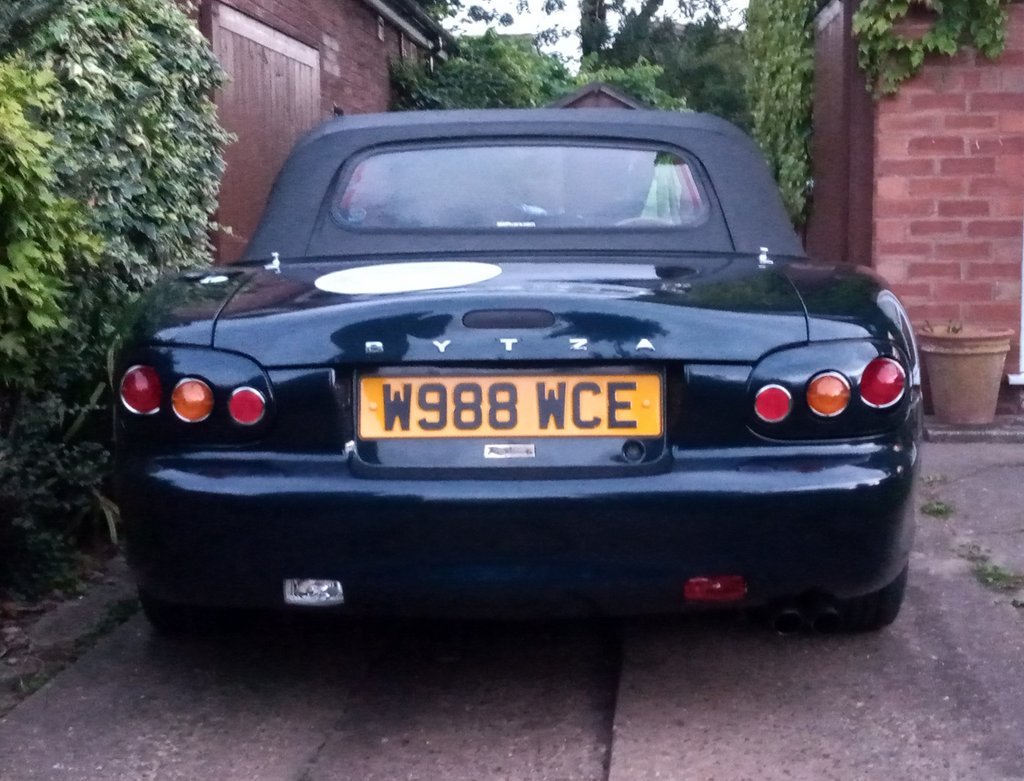  It definitely looks different and will take a little getting used to but I like it. I've put up a short video on YouTube to show the lights in action. Have a smashing day everyone, Cheers, Guy |
|
|
|
Post by Jeff - jthspace on Sept 4, 2022 9:43:35 GMT
Wow. They look fantastic (in my opinion). A lot of work but a great result. 👍 Can't add a "prize" on my mobile, will update later 😂
|
|


